Sensor API with Django (Part 1)
Disclaimer: This post is not a Django tutorial. The Django documentation has a really good one.
About 9 years ago we build an API to save particulates sensor data using Django and PostgreSQL. I was asked to build something similar, but this time with a few learnings from the previous iteration. Back then we never thought this will get that big, so the database table structure couldn't cope with the load later. Today I would chose a way more free data scheme with a lot less joins needed. This may require (async) postprocessing for displaying on a map, but removes joins on the database. For authentication the ESP internal id together with an (optional) pin was used. This limits to Espressif devices and may not be unique when using other manufacturers or microcontrollers. I plan on generating a ulid for every Sensor and not Node level. For authentication we will generate a random string per Sensor. There will be multiple secrets allowed and a comment field to make it easier to replace the secret later.
On the other hand I would do a lot of things the same way: Django is still the most boring choice. PostgreSQL (or maybe timescaledb) is still my choice for the database. The hosting will be on fly.io and the PostgreSQL instance managed by Supabase. This should be enough for quite a while and gives always the option to scale either with fly/supabase or move everthing to a Hetzner VPS and pay with your spare time instead of money.
This post will describe the initial setup of the Django service at fly.io with using Supabase for PostgreSQL and Mailgun for sending emails (i.e. password reset; or later password-less login). A second post will describe the Models and Views used.
The full code is in https://github.com/mfa/sensor-api.
First step is to setup a Django project. This is already well documented for example in the fly.io docs I followed this steps and deployed a first version using SQLite as database. Without a volume this database will be replaced on every deployment, so this clearly needs to be solved. For this I don't want to add a volume and start with SQLite, because I don't want to migrate the SQLite database to PostgreSQL later, we will use Supabase.
But some important steps before.
The SECRET_KEY in settings should never be in the repository, so we deploy a new one with fly secrets set SECERT_KEY=insert-some-secret-value-here and use it in settings.py.
For static files (i.e. the css/js of the admin) I added whitenoise.
We use a start.sh script as CMD at the end of the Dockerfile to start gunicorn.
Before this we add the collectstatic command to prepare the static files.
To get a PostgreSQL database we create a new project in the Supabase dashboard.
The password set on create is the password used to log into the database, so choose a long one!
Additionally we need the HOST and the USER, which can be found in the api settings, i.e. https://supabase.com/dashboard/project/YOUR_PROJECT_ID/settings/database.
On this database settings page we additionally need to download the client certificate and enable SSL enforcing.
Before we can use the Host, Password and User we need to give them to fly.io by setting the secrets, i.e. fly secrets set SUPABASE_HOST=aws-0-eu-central-1.pooler.supabase.com.
The same for SUPABASE_PASSWORD and SUPABASE_USER.
In the Django settings file we set the database like this:
DATABASES = {
    'default': {
        'ENGINE' : 'django.db.backends.postgresql',
        'NAME' : 'postgres',
        'HOST' : os.environ.get('SUPABASE_HOST'),
        'PASSWORD': os.environ.get('SUPABASE_PASSWORD'),
        'PORT': 5432,
        'USER': os.environ.get('SUPABASE_USER'),
        # from supabase: database/settings
        'CERT' : 'config.prod-ca-2021.crt',
    }
}
We add the migrate command to the start.sh, the same way we did for collectstatic.
The current start.sh:
#!/bin/sh

python manage.py collectstatic --no-input
python manage.py migrate --no-input

gunicorn --bind :8000 --workers 2 sensor_api.asgi:application -k uvicorn.workers.UvicornWorker
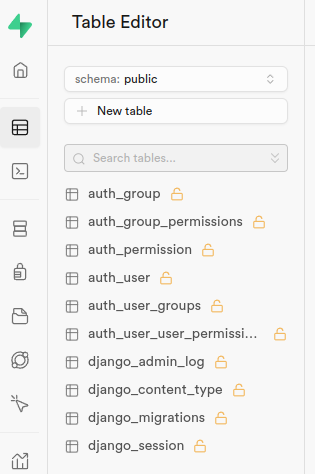
And the database with all tables created at Supabase looks like this:
To get the admin login work we need to add a user and a setting to fix CSRF for the fly.io setup.
The CSRF is fixed by adding SECURE_PROXY_SSL_HEADER = ('HTTP_X_FORWARDED_PROTO', 'https') to the settings.py.
As described in the Django documentation, we need this because otherwise the is_secure() check from Django fails because of the fly.io proxy.
The other thing we need is an Admin user. This is described in the Django getting started from fly.io and can be done via
Again choose a long password here!
To get password reset emails we want to enable sending emails.
In 2024 email is no fun anymore, so don't host your own mailserver until you know what you are doing.
I use mailgun because it is easy to use and the free plan should be enough for a while.
For email we again need some secrets. We not only add the password, but the username too.
So the same fly secrets set as described above for EMAIL_HOST_PASSWORD and EMAIL_HOST_USER and this lines in the settings.py:
if os.environ.get('EMAIL_HOST_PASSWORD'):
    EMAIL_HOST = 'smtp.eu.mailgun.org'
    EMAIL_PORT = 587
    EMAIL_HOST_USER = os.environ.get('EMAIL_HOST_USER')
    EMAIL_HOST_PASSWORD = os.environ.get('EMAIL_HOST_PASSWORD')
    EMAIL_USE_TLS = True
The page to reset the email is still missing and we will add that later, but we want to try if email sending works now.
The Django shell is started the a similar way we added the superuser before: fly ssh console --pty -C 'python /code/manage.py shell'.
In the the shell we send an email with the Django send_mail:
from django.core.mail import send_mail
send_mail("Testsubject", "Here is the message.", "from@example.com", ["to@example.com"], fail_silently=False)
Of course choose the email addresses ("from" and "to") to something you can receive and own.
This concludes Part 1.