ESP32 with Rust

Since Embassy only support ESP32C3 and I only have old ESP32 lying around I have to use a different toolchain than last week. As last week with the Pico this time I want to get a Rust program installed on an ESP32. I did not use probe-rs as last time, but cargo espflash.

First we need to install some Rust prerequisites listed in the ESP Rust book. We need Rust obviously. Best to install via rustup and not your system package. Then some ESP specific things:

cargo install espup
# install toolchain
~/.cargo/bin/espup install
# source the environment variables needed
. ~/export-esp.sh
# install ldproxy
cargo install ldproxy
# install cargo-espflash (binstall if you can)
cargo install cargo-espflash

To get which chip you have cargo-espflash can help:

$ cargo espflash board-info

Returns for my old ESP32:

Chip type:         esp32 (revision v1.0)
Crystal frequency: 40 MHz
Flash size:        4MB
Features:          WiFi, BT, Dual Core, 240MHz, Coding Scheme None
MAC address:       b4:e6:2d:97:d2:79

Next we need an example. To generate one we generate a new project based on a template:

# install generate
cargo install cargo-generate
# use generate to get a minimal example with a working cargo.toml
cargo generate esp-rs/esp-template -n blinky
# I chose "esp32" as MCU; without advanced options

Plugin the ESP32 on any USB port. To have write permissions you may need to add your user to a group that is allowed to write. I described this in a previous blog post.

Then build and install:

cargo build
# flash using cargo-espflash
cargo espflash flash --monitor

The code should now run on the ESP32 and printing first "Hello world!" and then "Loop..." until Ctrl-C is pressed.

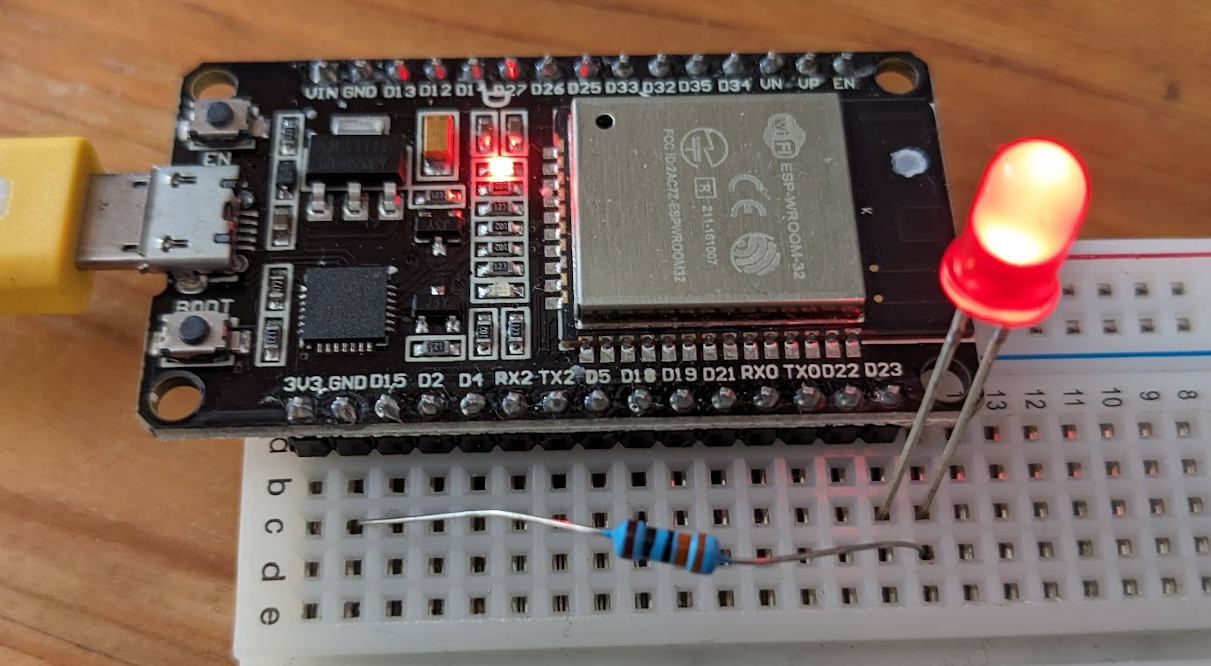
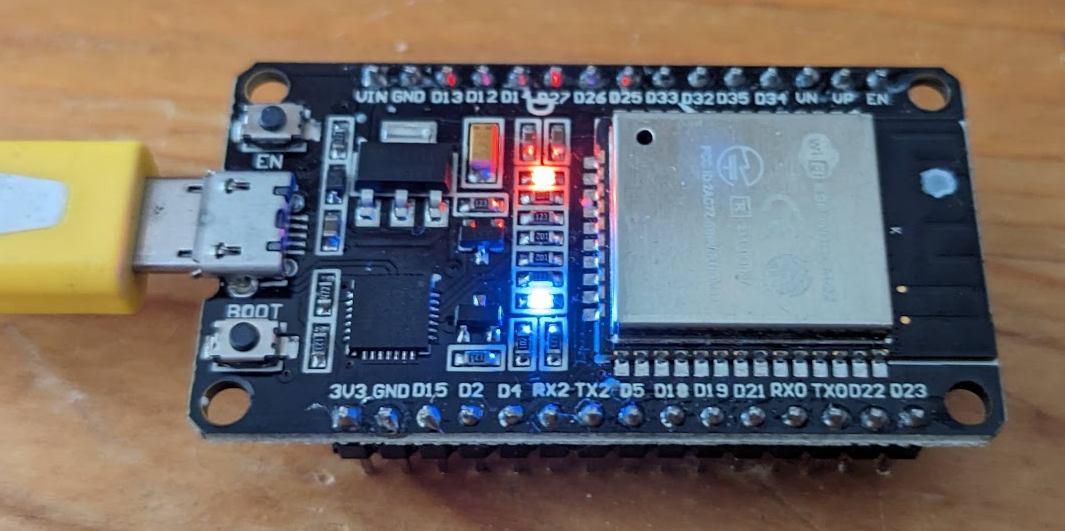
Now to the actual blinking (of an LED). The blue LED of my ESP-WROOM-32 is GPIO2. If your ESP32 doesn't have an LED you can connect one to a GPIO pin with a resistor (i.e. red LED and 330Ω) and connect the other side to ground. I used GPIO 23 for the example below because it is at the end of the ESP32.

Change the src/main.rs to:

#![no_std]
#![no_main]

use esp_backtrace as _;
use esp_hal::{clock::ClockControl, peripherals::Peripherals, prelude::*, Delay, IO};

#[entry]
fn main() -> ! {
    let peripherals = Peripherals::take();
    let system = peripherals.SYSTEM.split();

    let clocks = ClockControl::max(system.clock_control).freeze();
    let mut delay = Delay::new(&clocks);

    let io = IO::new(peripherals.GPIO, peripherals.IO_MUX);
    // change to the GPIO you used, GPIO2 for onboard blue LED (if you have)
    let mut led = io.pins.gpio23.into_push_pull_output();

    loop {
        delay.delay_ms(500u32);
        led.toggle().unwrap();
    }
}

Using GPIO2 on an ESP-WROOM-32:

img1

and using an external LED with a resistor:

img2

Raspberry PI Pico with Rust (Embassy)

After I failed to do HTTP requests in Micropython as described in a previous post, I felt like it is time to try Rust on the Raspberry PI Pico. Installing code on the Pico with Rust can be done using UF2 as with Micropython. But because there is no REPL there is no way to see the outputs of the program this way. So using a Debugprobe as described in the Embassy getting started is a good plan.

We need to prepare a second Pico as Debugprobe. The UF2 needed for this can be build as described in Appendix A of the Getting started with Raspberry Pi Pico. But building the UF2 is not neccessary because there is already a version available that can be easily flashed on the Pico by dragging it on the Pico filesystem after button-press connecting it to your computer.

Now lets build an example firmware with Embassy. Important here there are two versions of blinky: blinky.rs is for the Pico and the wifi_blinky.rs for the Pico W. I have a Pico W connected so I did this to compile (as described in the Getting started but with some Archlinux):

# setup rust (on Archlinux)
sudo pacman -S rustup cargo-binstall
# choose stable rust
rustup default stable

git clone https://github.com/embassy-rs/embassy.git
cd embassy/examples/rp
# build Pico W example
cargo build --bin wifi_blinky --release

# install probe-rs software - the binary will land in ~/.cargo/bin/probe-rs
cargo binstall probe-rs

Wire the Debugprobe Pico to the Pico we want to get our code on. My version of this:

img1

In the Appendix A of the Getting started with Raspberry Pi Pico is a schematic which is lot clearer than my photo!

I don't want to use sudo to use the Debugprobe, so we need a udev rule. This is described in the getting started of probe-rs:

curl https://probe.rs/files/69-probe-rs.rules > 69-probe-rs.rules
sudo mv 69-probe-rs.rules /etc/udev/rules.d
sudo udevadm control --reload
sudo udevadm trigger

Check that probe-rs is finding the Debugprobe Pico:

~/.cargo/bin/probe-rs list
# should return:
[0]: Debugprobe on Pico (CMSIS-DAP) (VID: 2e8a, PID: 000c, Serial: E660C06213776B27, CmsisDap

Finally run the blinky example:

cargo run --bin wifi_blinky --release

If successful this shows a lot of prints like this on your shell after flashing and initializing:

1.238451 INFO  led on!
└─ wifi_blinky::____embassy_main_task::{async_fn#0} @ src/bin/wifi_blinky.rs:58
1.238481 DEBUG set gpioout = [01, 00, 00, 00, 01, 00, 00, 00]
└─ cyw43::control::{impl#1}::set_iovar_v::{async_fn#0} @ /home/mfa/pico/embassy/cyw43/src/fmt.rs:130
2.239012 INFO  led off!
└─ wifi_blinky::____embassy_main_task::{async_fn#0} @ src/bin/wifi_blinky.rs:62
2.239030 DEBUG set gpioout = [01, 00, 00, 00, 00, 00, 00, 00]
└─ cyw43::control::{impl#1}::set_iovar_v::{async_fn#0} @ /home/mfa/pico/embassy/cyw43/src/fmt.rs:130

Use Pico to Track Time

Currently I track my working time with org-mode in Emacs. This works reasonably well for me, but it is time to try something different and see if it works better.

I want to use a Pico LCD 1.3 addon to a Raspberry PI Pico to track my worktime. The Pico will call the toggl API and show the current state on the display. There are a lot of alternatives to toggl, but their API looks nice and a friend already used it successfully.

My first try was to use urequests on the Pico to directly talk with the toggl API. This failed first because of SSL and then because of Content Length not correctly parsed/sent.

So this version is using a minimal Flask server running on a "normal" Raspberry PI to proxy. I use a few Raspberry PIs as sensors in my appartment, so I will run it on a PI that already runs. The code for the Flask server is in this Repository https://github.com/mfa/pico-toggl and is not part of this blogpost.

We will use urequests on the Pico to call the Flask server. To get the file I used curl to download and rshell to put on the Pico:

curl https://raw.githubusercontent.com/pfalcon/pycopy-lib/master/urequests/urequests/__init__.py > urequests.py
rshell "cp urequests.py /pyboard/"

Before starting using the Flask server we want to check if urequests can do simple requests. The Pico has no datetime (and we actually don't need it anymore, because we use the datetime of the Flask server). Still let's use this to check if http works by calling worldtimeapi.org.

Run this code in a rshell REPL:

# connect to wifi
import network
nic = network.WLAN(network.STA_IF)
nic.active(True)
nic.connect('your-ssid', 'your-key')
print(nic)

from urequests import request
r = request("GET", "http://worldtimeapi.org/api/timezone/UTC")
print(r.json()["datetime"])

This should return the current datetime in the UTC timezone. So Network and DNS works. We don't use SSL because when writing this post it failed for me.

The display was tricky to get to work. I tried both drivers from my previous post but failed, so I decided to use the code from Waveshare and modify it for this. The needed display.py is in the Flask repo in the pico folder: https://github.com/mfa/pico-toggl

Checking the switching of buttons is a bit tricky, but with a short delay and a few ifs manageable. The button used for this is the top button on the right (A) which is GP15.

The first working iteration (main.py):

import machine
import network
import utime
from display import LCD_1inch3
from urequests import request

def call_flask(path):
    r = request("GET", f"http://<ip-of-the-flask-server>:5000/{path}")
    return r.json()

def show_text(string):
    display.fill(0)
    display.text(string, 1, 1, display.white)
    display.show()

def show_state(state):
    if result.get("start") and result.get("stop") is None:
        show_text("started: " + result["start"])
    else:
        show_text("no entry started")

# connect to wifi
nic = network.WLAN(network.STA_IF)
nic.active(True)
nic.connect("wifi-ssid", "wifi-password")

# init display
display = LCD_1inch3()
display.fill(0)
display.show()

button_a = machine.Pin(15, machine.Pin.IN, machine.Pin.PULL_UP)
once = True

# show initial state when started
result = call_flask("state")
show_state(result)

while True:
    # check for button press + release
    button_a_press = button_a.value()
    utime.sleep_ms(10)
    button_a_release = button_a.value()

    if button_a_press and not button_a_release and once:
        once = False
        result = call_flask("toggle")
        show_state(result)
    elif not button_a_press and button_a_release:
        once = True

This version is by far not perfect and is only a working demo. For example is the font size way to small:

img1

There are lots of possible improvements: use the other buttons, show images instead of text, use more of the display, add error handling when the Flask server is not reachable and probably a lot more.